Always displays the pencil marks for every cell, the possibilities in green for unsolved cells.
Displays the pencil marks only for the highlighted/selected unsolved cells. The solved or given cells always displays their value.
Never displays the pencil marks for the unsolved cells. The solved or given cells always displays their value. This may be useful to publish an image on the web.
When selected, the split cages are displayed with a transparent colored background.
When selected, the jigsaw blocks (nonets) are displayed with a transparent colored background.
When selected, lines are displayed between the two cells of all strong links for the highlighted possiblity. This may help spotting patterns like Pointing Pairs, Generalized X-Wings, Turbot Fishes...
Show or hide the timer at the bottom-right corner of the window.
When selected, the naked or hidden singles moves deduced are listed in the log. Note: manual actions are always listed.
When selected, all naked singles revealed by a Deduce are solved. This is repeated until no naked single is found or the grid gets solved.
When selected and a cell gets solved, all 'special constraints' over the cell are updated to remove odd combinations. This includes such constraints as sum & split cages, (non) consecutive, less than, renban, bossanova...
When unselected and a cell gets solved, only the buddies of the cell have the solved possibility removed. It will not update 'special constraints' for odd combinations.
Shows a dialog which let you change several options. All the settings are saved in the user preferences from one run to the other.
Note: Under Mac OS X, this is moved to the application menu as appropriate.
Buttons at the top of the dialog let you switch between sub-views.
The Defaults icon at the bottom let you reset all settings to their defaults.
The Apply button at the bottom will store the settings without closing the window.
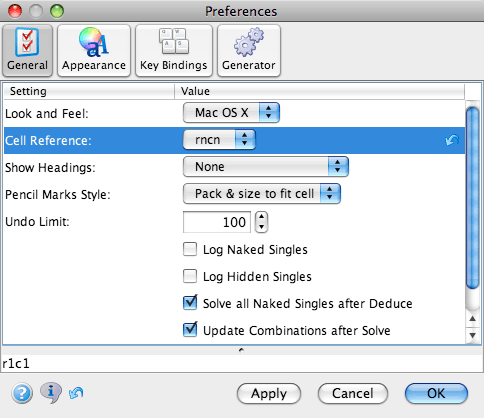
The General preferences let you change:
The Java Look and Feel (L&F). By default, it uses the system L&F, here Mac OS X Aqua since JSudoku was running on a Mac. It will usually also list Metal, the Java OS independant L&F and CDE/Motif. Note: the Apply button does not change the L&F, you should click OK.
The Cell Reference notation. You may choose RNCN or K9 notation, in upper or lower case. References / notations of rows, columns, nonets... will be consitent with the one used for cells.
You may Show Headings, to display columns and rows headings either at the top and left-hand sides or at all fours sides around the grid. They are also printed and included in the copied image. The font is the one specified for cells.
You may specify the Pencil Marks Style: 'Pack & size to fit cell', 'Fixed location & size' or 'Dots'.
You may change the maximum number of Undo.
The other options are aliases of the corresponding item in the Options menu.
The Appearance preferences let you change display options: fonts, colors and strokes
The Property column at the left lists the description. Composite properties are grouped in an hierarchical item which can be expanded or collapsed by clicking the + or - icon (or triangle or lever depending the L&F). Some of the simple properties are common to several composite properties. For example, all cells' properties use the same font, but may have different colors.
The Preview column at the right displays a preview of the properties. Click on the preview item to edit a property. This opens the property editor dialog or expands the composite property. The preview in the Prefences dialog is updated as you make changes in the property editor. You may click on another property in the Preferences dialog while the property editor is open. The property editor will then start editing the new property.

The Font editor let you choose a font family, style and size. It should list the fonts installed on your computer and supported by Java.
Note: The font size is ignored by the cells, since the text is resized to fit in the cell.

The Color editor let you change colors. The three first sub panels are standard Java editors which let you choose some samples / swatches, edit the Hue, Saturation and Brightness (HSB) or Red, Green and Blue components (RGB). I've added the Alpha panel to let you control the transparency / opacity of the color. Note that the standard Java editors will usually turn a transparent color into an opaque one. If you edit transparent colors like Diagonals or Twin cage background, you should then restore their alpha value which was removed by the standard Java editors. FYI, by default, both use an alpha of 32.
Note: Java will localize the dialog depending the System locale / language (here French).

The Stoke editor let you change the line width, end cap (for open paths), line join (for corners) and the dash pattern. For a plain line, the dash pattern is empty. For a dashed or dotted line, the dash pattern lists alternating dashes and spaces separated by ';' (semicolons) like in this example showing a pattern of dashes of 6 pt separated by spaces of 3 pt. The combo box also lists some examples.

The Key Bindings preferences let you change, add or remove key shortcuts alias accelerators.

The Action column at the left-hand side lists the menus which you may expand or collapse by clicking the + or - icon (or triangle or lever depending the L&F).
The Keys column at the right-hand side lists the key shortcut(s) bound to the action. Depending the L&F, the modifiers control, shift, alt, command or meta are displayed with text or symbols like in this screen shot for Mac OS X. Several keys are separated by vertical bars.
To edit keys, click on the key item. It will then show button(s) and the + and X icons. To change an existing key, click on its button to select it, like cmd - here over. You may then type another key possibly combined with modifier(s), or click again on the button to leave it unchanged. To remove a key, select its button, then click on the X icon. To add another key, click on the + icon, then type the key.
Note: Keys on the numeric key pad are usually distinct from the corresponding key on the main keyboard. For example Innies is bound to both keys: minus (main keyboard) and subtract (numeric key pad).
Note: Some actions cannot have a key shortcut. Clicking on the Keys item on such actions does not show the + and X icons. For example all fetch actions.
The Grid tab shows actions specific to the grid and cells. Accelerators for digits are displayed with a '#' which is a place holder for the digit. When editing, the actual key pressed will be replaced with a '#'.
The Keys tab shows a flat list storted by keys. You may edit some key with a double click. It will then switch to the Menus hierarchical list, expand the menu and select the corresponding key button.
The Generator preferences let you control the generators for grids, jigsaw and killer templates.

You may turn off Generate Grid at Start to start with an empty grid when the program launches or a creates a new window.
You may control the Difficulty based on solving techniques:
Choose Any to generate grids without checking solving techniques used.
Some difficulties are build-in. They cannot be edited, but may be viewed or exported:
Super Easy and Very Easy generates grids which can be solved with hidden singles only. At each step, several hidden singles are available. See Singles Bottleneck.
Easy generates grids which can be solved with singles only. But, at some stage(s), there may be only one single available.
Medium, Hard and Very Hard generates grids which require some harder technique(s). Open the Solvers list item to view them.
Insane generates grids which requires yet harder techniques, or even trial and error. It uses the Should not solve option to generate grids which cannot solve using the techniques in the Solvers list item.
You may use your own difficulty(ies). To create an editable custom difficulty, select first some build-in difficulty, then export it by clicking the floppy disk icon. You may also import some existing difficulty by clicking the folder icon. You may edit the name of custom difficulties, which is used only for display.
You may limit the Number of guesses to a range. This expert option is disabled unless the Unlock expert options is checked. The upper slider controls the minimum value and the lower slider controls the maximum value. Usually the lower, the easier; the higher, the harder. If the minimum is too high or the range is too narrow, the generator may not find a suitable grid. Therefore, it is strongly advised to specify a minimum number of guesses below 5 and a range wide enough.
Notes: Filtering based on techniques gives finer control, more human-oriented. Guesses are more computer-oriented. Guesses values are ignored when Singles Bottleneck is set above zero.
Singles Bottleneck is used for very easy grids only. It's the minimum number of singles available at each step. This should produce easy grids, like those found in most newspapers. This expert option is disabled unless the Unlock expert options is checked.
Warning: This setting should be set to zero most of the times. Otherwize the generated grid will always be solvable with singles only, regardless of other options.
The Solvers list contains the sequence of allowed solving techniques used to filter grids.
Only custom difficulties are editable. To add solving techniques, select them in the main window and drag them over the Solvers list item in the Preferences window. You may also reorder them using drag-and-drop. To remove solving techniques, click the delete icon with an X.
Warning: techniques should be ordered from easiest to hardest. Naked and hidden singles should come first (at the top).
Unselect Should not solve to generate grids which should solve using this list of techniques but no more than allowed. Select Should not solve to generate hard grids which do not solve using this list of techniques or which require a technique to be used more than allowed. This option is disabled unless the Unlock expert options is checked.
Warning: this option should be selected only for hard grids.
Select At most to limit the maximum number of times a technique may be used. When unselected, it may be used any number of times.
Select At least to require a technique to be used a minimum number of times. When unselected, the technique could be used or not. This expert option is disabled unless the Unlock expert options is checked. Indeed, requiring a technique to be used several times is unlikely to produce any suitable grid, in particular for unusual or very hard techniques. All together, there should be no more than one or two required techniques.
Some techniques have a Size specifying the pattern size or length. For example a naked triplet has a size of 3, an XY-chain may be limited to some length, a Sue de Coq may be limited to some number of cells... This expert option is disabled unless the Unlock expert options is checked.
In addidtion to the sequence of allowed solving techniques, you may also specify sub-sets of techniques and control the maxinum and/or minimum number of times all of them may/must be used. This is based on the total number of times all individual techniques in the sub-set are used. As an example, you may inspect the Medium build-in difficulty which requires the grid to use at least two times some technique among intersections, naked/hidden pairs and triplets. It could be one intersection + one naked pair; or two intersections; or one of each... It also limits to 10 the maximum number of times all these techniques may be used. For example, it will discard a grid requiring 6 intersections and 5 naked pairs.
To create a new sub-set of techniques, select solvers within the Solvers list then drag-and-drop them over the Solvers list item itself. To add solvers to an existing sub-set, select solvers within the Solvers list then drag-and-drop them over the sub-set item. You may edit the sub-set's name which is used only for display. You may create several sub-sets of techniques, each with its own maximum and minimun. The ordering of techniques within sub-sets is irrevelant.
Note: controling the difficulty based on solving techniques is not yet supported to generate killer sudoku nor greater/less than sudoku. It's currently used only for sudoku with given clues.
The Givens are used only when generating grids with givens. Unused for Killer and Greater/less than variants.
You may control the Symmetries. Click on a symmetry icon to disable or enable it. The generator will use one of the enabled symmetries to place the givens.
The Number of givens are based on the number of cells and changes whenever the grid size or the overlapping variant changes. It is strongly advised to specify a maximum number of givens large enough, otherwize the generator will not find a suitable grid. For 3x3 sudoku, a reasonable maximum number of givens should be above 24. For Latin squares, you should yet increase the maximum number of givens since it has fewer houses.
You may select No givens in overlapping cells to avoid placing givens in the overlapping areas. This is unused for single grids like vanilla sudoku. It is strongly advised to deselect this option for overlapping variants with a high proportion of overlapping cells: DoubleDoku, Butterfly, Flower. Clueless variants will never have givens in the clueless sub-grid, whichever this setting.
You may control the Jigsaw template generator:
Only simple Symmetries are available for jigsaw.
The Compactness controls how compact vs sparse / thin... jigsaw pieces may be. It's the maximum allowed difference between length and width. Decrease to get more compact pieces. Increase to allow longer, thinner pieces. The values are based on the grid size and changes whenever the grid size changes.
You may control the Killer template generator:
You may control the Symmetries and Compactness like for Jigsaw template.
You may control the Diagonal connections, diagonal cages connecting through corners.
You may control the Cage sizes. Decrease the maximum to get a template with smaller cages, which usually yields a grid easier to solve. The minimum is 2 by default, but you may set it to 1 to allow cages with a single cell. Increase the maximum or minimum to get a killer with larger cages. Widen the range to mix more various sizes. It is strongly advised to specify a range wide enough, otherwize the generator may not find a suitable cage template.
The Cages per sizes is an expert option giving finer control over the number of cages for each size. Select Unlock expert options to edit it.
The text field on the left-hand side specifies the cage size(s), the number of cells in the cage. For example, 2 for cages with 2 cells, dominoes. You may specify a range or set of cage sizes. For example '6-10' for cages containing 6 to 10 cells; or '4;6' for cages with 4 or 6 cells (but not 5). Cage sizes may overlap, they do not have to be disjoint. For example, you may control cages with 6 cells and also cages with 6 to 10 cells. You may add or remove cage settings using the + and x icons.
The sliders on the right-hand side controls the minimum and maximum number of cells covered by cages of given size(s). The information message also indicates the number cages.
JSudoku does some basic check for inconsistent values or too restrictive. For example, it checks the sum of all maximum number of cells is greater than the total number of cells. When settings looks inconsistent or too restrictive, an error or warning icon is displayed next to the killer combo box. A 'first aid kit' icon is also displayed; clicking on this icon will widen the ranges.
You may control Expert Options:
Some options are uneditable, unless you select Unlock expert options.
You may control the Retry delay after which the generator with interrupt and restart filling a grid with other numbers. This is an expert option, used mainly for overlapping variants or highly constrained grids like Argyle diagonals.
File | Edit | Solve | Highlight | Design | Options | Window | Help | Cell contextual popup menu | Solver contextual popup menu
Copyright (C) 2006-2008 Jean-Christophe Godart. All rights reserved.